react-router v2リリース
しばらくrc版を用いて開発していましたが、react-router v2が昨日か一昨日ぐらいにリリースされていました。ドキュメントも新しくv2になってます。
react-router/ComponentLifecycle.md at latest · rackt/react-router · GitHub
いつからあったかは定かではないですが、コンポーネントライフサイクルに関するドキュメントが良い情報。これはv2に限らず以前のバージョンでも同じ。パス遷移した時に各ページを構成するコンポーネントのどんなライフサイクルイベントが発火されるかの説明です。説明されるまでもなく慣れると体験的に知ってることなのですが、初めにこのドキュメントを読んでたら近道だったように思います。
react-router/testing.md at latest · rackt/react-router · GitHub
テストも。Jestのユースケースとして初見で参考になる。
TestUtilsが関数コンポーネントダメだって
'use strict';
/*global jest*/
jest.dontMock('../BootstrapResponsive');
const React = require('react');
const ReactDOM = require('react-dom');
const TestUtils = require('react-addons-test-utils');
import {ResponsiveCol} from '../BootstrapResponsive';
describe('Col', () => {
    it('hidden setting', () => {
        const col = TestUtils.renderIntoDocument(
            <ResponsiveCol xs={{hidden: true}} sm={{hidden: true}} md={{hidden: false}}/>
        );
        const colNode = ReactDOM.findDOMNode(col);
        expect(colNode.getAttribute('class').trim()).toEqual('hidden-xs hidden-sm');
    });
});
Jestで後付けにテスト書いたら、TestUtilsが関数コンポーネント(ステートレスコンポーネント)に対応していなくてダメだって。
Using Jest CLI v0.8.2, jasmine1
Running 1 test suite...Warning: ResponsiveCol(...): No `render` method found on the returned component instance: you may have forgotten to define `render`, returned null/false from a stateless component, or tried to render an element whose type is a function that isn't a React component.
「you may have fogotten to define 'render'」って、忘れてないよ!わざとだよ!「returned null/false from a stateless component」って。。。どう言うこっちゃ?
というところで、これはテストそのものが動かなかったけど、Jestは便利です。以下設定備忘。
babel, babel-preset-es2015, babel-preset-reactはすでに入ってる前提でJestインストール。
$ npm install --save-dev jest-cli babel-jest react-addons-test-utils
package.jsonにJestの設定追加。
{
  "babel": {
    "presets": [
      "es2015",
      "react"
    ]
  },
  "jest": {
    "scriptPreprocessor": "<rootDir>/node_modules/babel-jest",
    "unmockedModulePathPatterns": [
      "<rootDir>/node_modules/react",
      "<rootDir>/node_modules/react-dom",
      "<rootDir>/node_modules/react-addons-test-utils",
      "<rootDir>/node_modules/fbjs"
    ]
  },
  "scripts": {
    "test": "jest"
  }
}
で、あとはソースツリーの書きたいところで、「__tests__」フォルダを作ってその中に.jsファイルを置く。ファイルの中身は冒頭のようなのです。es6もJSXも設定で有効にしてます。中身がJasminなのでJasminな書き方にJest特有のモック自動生成、ReactアドオンTestUtilsのツールで仮想DOM-テストDOMの連携動作が乗っかります。
リファレンスは以下。
- Jestの設定: Jest | Painless JavaScript Unit Testing
- TestUtilsのAPI:Test Utilities | React
- DOM element:Element - Web APIs | MDN
- そもそものJasmin: Jasmine: Behavior-Driven JavaScript
リファレンスまとめて気がついた。Jasminは1.3.0で古い。node_modules配下のjest-cliを見ると腹にjasmin2.3.4を抱えてたので切り替える設定がありそう。
追記
。。。切り替え設定ありました。
https://facebook.github.io/jest/docs/api.html#config-testrunner-string
さっきの設定に一行足します。
  "jest": {
    "scriptPreprocessor": "<rootDir>/node_modules/babel-jest",
    "testRunner": "<rootDir>/node_modules/jest-cli/src/testRunners/jasmine/jasmine2.js",
    "unmockedModulePathPatterns": [
      "<rootDir>/node_modules/react",
      "<rootDir>/node_modules/react-dom",
      "<rootDir>/node_modules/react-addons-test-utils",
      "<rootDir>/node_modules/fbjs"
    ]
  },
実行したら、ちゃんと2だって言ってる。今まで1.3でも支障なかったけど今日から2.3にしておこう。
Using Jest CLI v0.8.2, jasmine2
Running 1 test suite...
BootstrapのGridをReactに持ってきてみた。
material-uiを気にいって、それでReactアプリ書いてます。発展途上ではあるも開発者の方々がこまめにがっつり頑張ってくれてて、日々npm updateをかけるのが楽しみです。そんなmaterial-uiも今の所はGridレイアウトのコンポーネントはありません。Google謹製マテリアルデザインのCSSライブラリであるMaterial Design Lightは画面幅を12分割するというBootstrap近似仕様のGridレイアウトがありますので、まあ、対抗してmaterial-uiにもそのうち作られるかな。
Reactコンポーネントとしてもいくつかあるようですが、今の所良さそうなものが見つからなかったので暫定的にBootstrapを持ち込んで軽め対応してみました。スタイルはインラインで書くようにしていたので、Gridだけとはいえcssファイルに外だしちゃうのがちょっと嫌だったけど、手もかけたくなかったので素に近い使い方に止めてます。
$ npm install --save bootstrap-sass
いろいろ試行錯誤してみた結果、SASS版Bootstrapから必要箇所を取り込んで使うことにしました。上記npmインストールでnodo_modules配下にSASSソースの最新版が管理されます。
/* /src/sass/style.scss */
@import "../../node_modules/bootstrap-sass/assets/stylesheets/bootstrap-sprockets";
@import "../../node_modules/bootstrap-sass/assets/stylesheets/bootstrap/variables";
@import "../../node_modules/bootstrap-sass/assets/stylesheets/bootstrap/mixins";
@import "../../node_modules/bootstrap-sass/assets/stylesheets/bootstrap/grid";
@import "../../node_modules/bootstrap-sass/assets/stylesheets/bootstrap/scaffolding";
@import "../../node_modules/bootstrap-sass/assets/stylesheets/bootstrap/responsive-utilities";
自分のスタイルシートを作って必要なだけimport。これをgulp-sassでコンパイル。
// gulpfile.js
'use strict';
var gulp = require('gulp');
var sass = require('gulp-sass');

gulp.task('SASS', function() {
    gulp.src('src/sass/*.scss')
        .pipe(sass())
        .pipe(gulp.dest('dest/public/css'));
});
コンポーネントはcontainer-row-colの組み合わせ。
// BootstrapResponsive.js
'use strict';
const React = require('react');

function ResponsiveContainer(props) {
    return (
        <div className={props.fullWidth ? 'container-fluid' : 'container'}>
            {props.children}
        </div>
    );
}

ResponsiveContainer.propTypes = {
    fullWidth: React.PropTypes.bool,
    children: React.PropTypes.node.isRequired
};

function ResponsiveRow(props) {
    return (
        <div className='row'>
            {props.children}
        </div>
    );
}

ResponsiveRow.propTypes = {
    children: React.PropTypes.node.isRequired
};

function ResponsiveCol(props) {
    const className = ['xs', 'sm', 'md', 'lg'].map((type) => {
        const value = props[type];
        var result = [];
        if(value) {
            var valueSize = 0;
            if (typeof value === 'number') {
                valueSize = value;
            } else {
                const {size, offset, visible, block, inline, hidden} = value;
                valueSize = size;
                if (0 <= offset && offset <= 12) {
                    result.push('col-' + type + '-offset-' + offset);
                }
                if (visible) {
                    result.push('visible-' + type + '-' + (inline ? (block ? 'inline-block' : 'inline') : 'block'));
                }
                if (hidden) {
                    result.push('hidden-' + type);
                }
            }
            if (1 <= valueSize && valueSize <= 12) {
                result.unshift('col-' + type + '-' + valueSize);
            }
        }
        return result.length > 0 ? result.join(' ') : '';
    }).join(' ');
    return (
        <div className={className}>
            {props.children}
        </div>
    );
}

const responsivePropsType = React.PropTypes.oneOfType([
    React.PropTypes.number,
    React.PropTypes.object
]);

ResponsiveCol.propTypes = {
    xs: responsivePropsType,
    sm: responsivePropsType,
    md: responsivePropsType,
    lg: responsivePropsType,
    children: React.PropTypes.node.isRequired
};

export {ResponsiveContainer, ResponsiveRow, ResponsiveCol};
今回はステートレスなコンポーネントだったのでシンプルに関数で書いてみました。公式ドキュメントReusable Components | React)の説明以外に見ない書き方ですが不要なお決まりイディオム抜きで良い感じだと思います。今回は一発で書いちゃってますがロジックを細かく関数分割すればテストもしやすいでしょう。
およそBootstrapのGridシステムについてのドキュメント(CSS · Bootstrap #gridと CSS · Bootstrap #responsive-utilities-classes)に書かれていたものの8割ぐらいは実装しました。まあdivタグにクラス文字列埋めるだけですからね。残したのはclearfixとpull/push。やっても直接divタグ書くのと何が違うのかって感じだからもっと抽象度を高める利用アイディアなきゃいらないかなと思います。
const React = require('react');
import {Card, CardText} from 'material-ui';
import {ResponsiveContainer, ResponsiveRow, ResponsiveCol} from './BootstrapResponsive';

/*中略*/

<ResponsiveContainer fullWidth={true}>
    <ResponsiveRow>
        <ResponsiveCol xs={{size: 12}} sm={6} md={{size: 8, offset: 2}} lg={{size: 4, offset: 0}}>
            <Card>
                <CardText>
                    Lorem ipsum dolor sit amet, consectetur adipiscing elit.
                    Donec mattis pretium massa. Aliquam erat volutpat. Nulla facilisi.
                    Donec vulputate interdum sollicitudin. Nunc lacinia auctor quam sed pellentesque.
                    Aliquam dui mauris, mattis quis lacus id, pellentesque lobortis odio.
                </CardText>
            </Card>
        </ResponsiveCol>
        <ResponsiveCol xs={{hidden: true}} sm={6} md={{size: 8}} lg={{size: 4}}>
            <Card>
                <CardText>
                    Lorem ipsum dolor sit amet, consectetur adipiscing elit.
                    Donec mattis pretium massa. Aliquam erat volutpat. Nulla facilisi.
                    Donec vulputate interdum sollicitudin. Nunc lacinia auctor quam sed pellentesque.
                    Aliquam dui mauris, mattis quis lacus id, pellentesque lobortis odio.
                </CardText>
            </Card>
        </ResponsiveCol>
    </ResponsiveRow>
</ResponsiveContainer>
- xsサイズでは全幅の一つと、もう一つは消す。
- smサイズでは横二分割。
- mdサイズでは左右余白2で8幅。縦に並べる。
- lgサイズでは4幅で横に並べる。
やってることは原始的だけど意外に使える。外出しになってるBootstrapのCSSがコンポーネントにインライン化できればいいんじゃないかな。css擬似要素とメディアクエリをインライン縛りにどう移植するか。。。擬似要素はspanを動的に足してくかだな。メディアクエリはScriptで幅をとって計算。。。サーバ描画でうまくないなあ。
ReactのES6-classでのコンテキスト
class PutContext extends React.Component {
    getChildContext() {
        return {color: '#03a9f4'};
    }
    render() {
        return <div>{this.props.children}</div>;
    }
}
// childContextTypesはpropTypesと同じスタイルの設定
PutContext.childContextTypes = {color: React.PropTypes.string};

class GetContext extends React.Component {
    // コンストラクタの第二引数にcontextが渡され、コンテキストを利用したstate初期化が可能
    constructor(props, context) {
        super(props, context);
        this.state = {
            color: context.color
        };
    }

    render() {
        const color = this.state.color;
        return <div style={{color: color}}>the context color is {color}.</div>;
    }
}
// contextTypesもpropTypesと同じスタイルの設定
GetContext.contextTypes = {color: React.PropTypes.string}
react/ReactComponent.js at master · facebook/react · GitHub
上記リンク先、React.Componentのソースを見るとドキュメントに明らかな第一引数のpropsだけでなくコンストラクタには第二、第三の引数があってコンテキストが渡されてきてました。よってES6-classを用いたときに従来のgetInitialState()をコンストラクタ内の処理で置き換える際にコンテキストを参照することが可能。
WebStormでESLintを使う
数日、バタバタと調査しては考えが変わる毎日ですが、ES6-classでReactアプリを書く前提が整ってきました。
- classボディ外に、propTypes/contextTypes/childContextTypesを書くのも、そういうものと思えばまあいいか
- MixinはAOP的なラッパーコンポーネントを生成する関数で書く。移行もすでにES6記法で書いてたのでさほど面倒ではない
- contextはES6-classでも大丈夫だった
- BabelでES5へトランスパイルし、Browserifyでクライアント用はまとめる。
- テスト周りがちょっと試行不十分だけど、Jest&Babel&Gulpで簡単なものはOK
おそらく最後にして最大の課題はIDEのことです。コード的にはOKでもIDEがエラーや警告だしたり、逆に出すべきところで沈黙してたりすると書き方云々以上にストレスですから。今、私はWebStorm11をサブスクリプション購入してますのでそこでの設定。Preferencesを眺めてちょこちょこ試したらうまくいった(ドキュメントはあるけど、それだけ読んで調べられるかというと、込み入ったことは進化が早すぎるからか追いついていないようで期待できないし、恐ろしいことに有料の商用IDEだからなのかググっても情報がなかなかでてこない)。

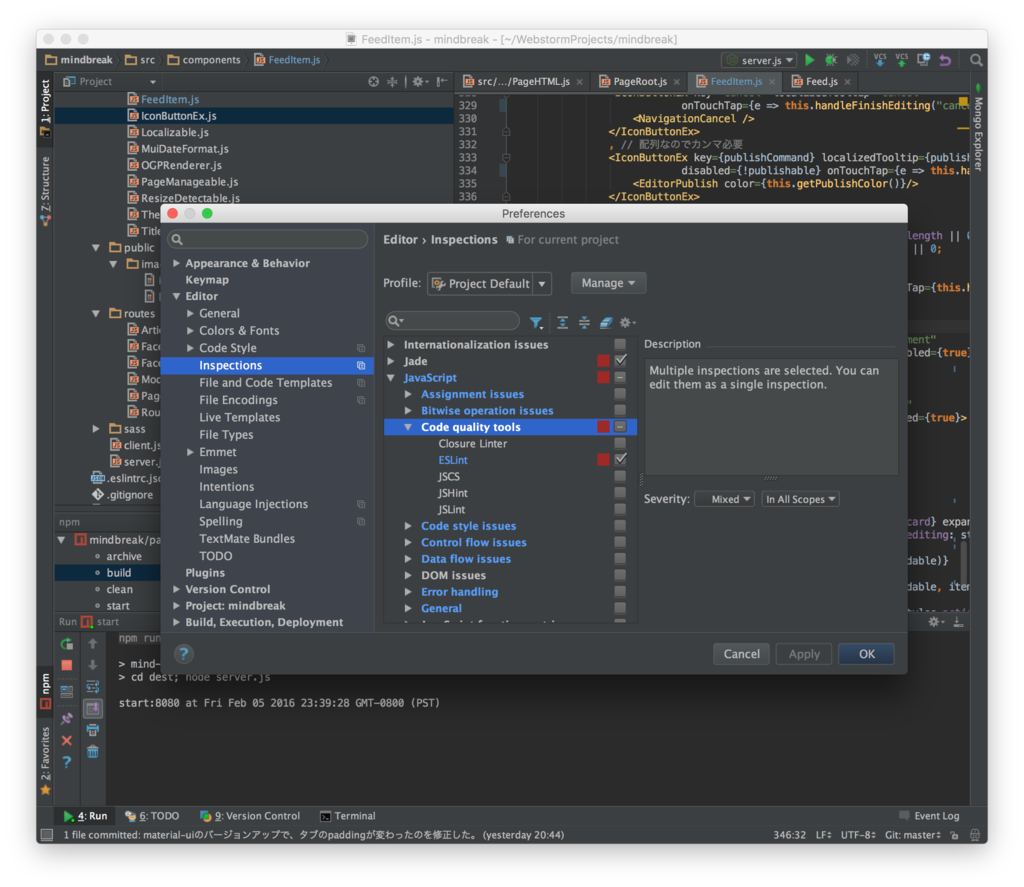
まず、WebStorm標準のソースインスペクタを切る。[Editor]->[Inspections]->[JavaScript]のチェックを外す。画像は[Code quality tools]->[ESLint]がチェックされているけどこれは後の作業で自動でチェックされます。
すでにBabel/BabelのReact及びES2015プリセットが入ってる前提で、以下のnpmインストールを実行。
$ npm install --save-dev eslint
$ npm install --save-dev eslint-plugin-react
$ npm install --save-dev babel-eslint
ちなみに私のpackage.jsonのdevDependenciesは今日時点で以下のようになってます。全部プロジェクトのnode_modulesに入れるようにしていて、グローバルにはnpmとnしか入れてません。それが正しいのか正しくないのかは知らない。
{
  "devDependencies": {
    "babel-eslint": "^4.1.8",
    "babel-jest": "^6.0.1",
    "babel-preset-es2015": "^6.3.13",
    "babel-preset-react": "^6.3.13",
    "babelify": "^7.2.0",
    "browserify": "^12.0.2",
    "eslint": "^1.10.3",
    "eslint-config-standard": "^4.4.0",
    "eslint-plugin-react": "^3.16.1",
    "eslint-plugin-standard": "^1.3.1",
    "gulp": "^3.9.0",
    "gulp-babel": "^6.1.2",
    "gulp-sass": "^2.2.0",
    "gulp-zip": "^3.1.0",
    "jest-cli": "^0.8.2",
    "react-addons-test-utils": "^0.14.6",
    "vinyl-source-stream": "^1.1.0"
  }
}

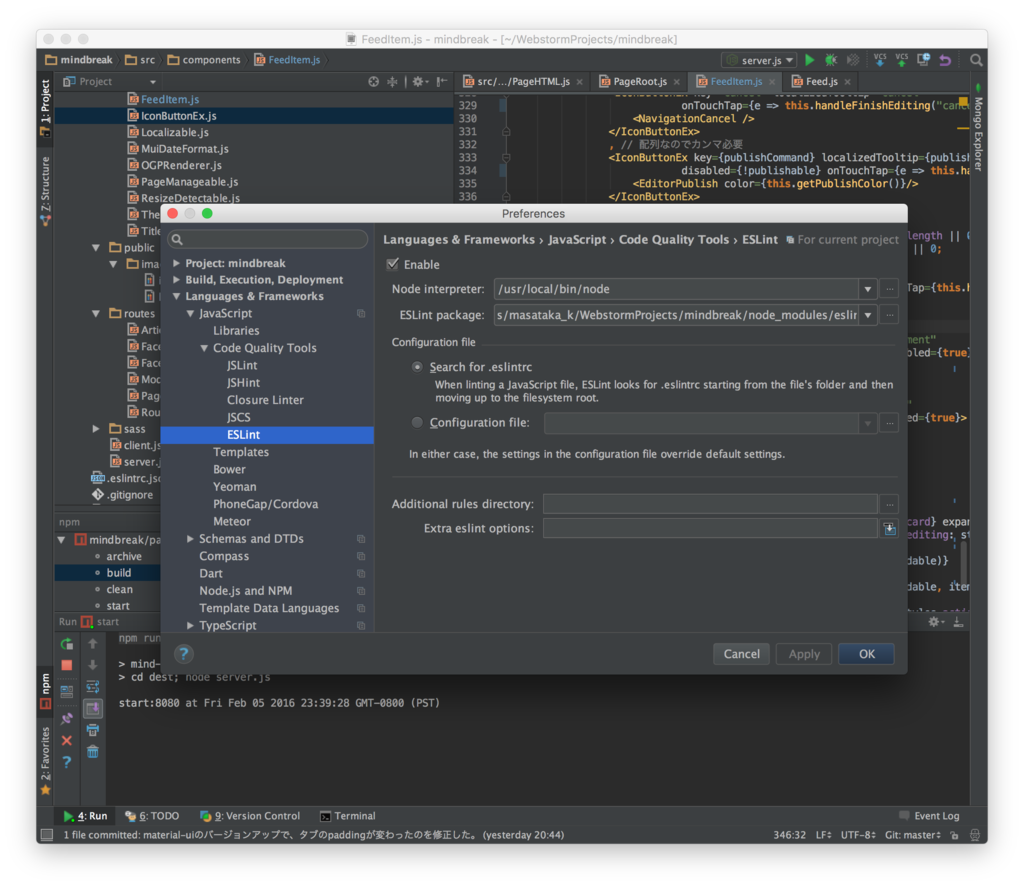
[Languages & Frameworks]->[JavaScript]->[Code quality tools]->[ESLint]をEnableにチェック!NodeとESLintの場所を適切に設定する。
プロジェクトルートに.eslintrc.jsonを配置します。設定ウィザードをコマンドラインで「eslint --init」実行してみたけど大したもの吐いてくれなかったので結局はググって拾ってきたのをいじりました。以下、何も省略せずに今日の私の設定です。ポイントは"parser"にbabel-eslintを設定しているところと"plugins"にreactを追加しているところ。eslint標準のパースに任せるとどうも何もおかしくないところで構文解析エラーを出したりするのでうまくない。先にnpmインストールしているbabel-eslintが全部キッチリと一本化して素敵なようす。
// .eslintrc.json
{
    "parser": "babel-eslint",
    "extends": "eslint:recommended",
    "env": {
        "es6": true,
        "node": true,
        "jasmine": true,
        "browser": true
    },
    "ecmaFeatures": {
        "jsx": true,
        "experimentalObjectRestSpread": true
    },
    "plugins": [
        "react"
    ],
    "rules": {
        "strict": [2, "global"],
        "no-const-assign": 2,
        "no-console": 0,
        "no-unused-vars": 1,
        "indent": [2, 4],
        "quotes": [2, "single"],
        "linebreak-style": [2, "unix"],
        "semi": [2, "always"],
        "react/display-name": 0,
        "react/forbid-prop-types": 0,
        "react/jsx-boolean-value": 0,
        "react/jsx-closing-bracket-location": 0,
        "react/jsx-curly-spacing": 1,
        "react/jsx-equals-spacing": 1,
        "react/jsx-handler-names": 1,
        "react/jsx-indent-props": 0,
        "react/jsx-indent": 1,
        "react/jsx-key": 1,
        "react/jsx-max-props-per-line": 0,
        "react/jsx-no-bind": [1, {"allowArrowFunctions": true}],
        "react/jsx-no-duplicate-props": 1,
        "react/jsx-no-literals": 0,
        "react/jsx-no-undef": 1,
        "react/jsx-pascal-case": 1,
        "react/jsx-quotes": 1,
        "react/jsx-sort-prop-types": 0,
        "react/jsx-sort-props": 0,
        "react/jsx-uses-react": 1,
        "react/jsx-uses-vars": 1,
        "react/no-danger": 0,
        "react/no-deprecated": 1,
        "react/no-did-mount-set-state": 1,
        "react/no-did-update-set-state": 1,
        "react/no-direct-mutation-state": 1,
        "react/no-is-mounted": 1,
        "react/no-multi-comp": 0,
        "react/no-set-state": 0,
        "react/no-string-refs": 1,
        "react/no-unknown-property": 1,
        "react/prefer-es6-class": 0,
        "react/prop-types": 1,
        "react/react-in-jsx-scope": 1,
        "react/require-extension": 1,
        "react/self-closing-comp": 1,
        "react/sort-comp": 0,
        "react/wrap-multilines": 1
    }
}
以下、発見と感想。
- "react/jsx-boolean-value" は意味あんのかな?true縛りの記述にしてfalseは書かせないとか。。。
- "react/jsx-no-literals" はスタイルとしてよりダメな方かなと。まあどちらでもいいけど
- "react/jsx-no-bind" は全部禁じちゃうと手が出なくなる。 [1, {"allowArrowFunctions": true}]にしました。このことによって、bind(this, "flag")を使わなくても onClick={e => this.handleClick("flag", e);} ってできるようになる。
- "react/no-string-refs" は謎でなく目うろこだった。これまでref="foo"だったところを、ref={ref => this.foo = ref}ってref-callbackを使うと。このref-callbackはReactの公式ドキュメントにちゃんと書いてあった! (https://facebook.github.io/react/docs/more-about-refs.html)Stringで名前つけて参照するのと違って堅くなっていいね!
- "react/no-set-state" は、this.setState({foo: bar}); と言う状態操作を禁じる。禁じるとユーザーリアクションのあるアプリ書けないと思うんですけど?私にはまだ謎。
- 最後に"react/prefer-es6-class"!。私はこれを1に設定しました。ES6-classを使わないと警告。今はたくさん警告出てます。
ESLintサイコー。細かく警告やエラーに調整できた上で、ソースコードではコメントで部分抑制かけられるので堅め設定しておいて適宜明示的に緩めるというのがサイコー。WebStormの標準インスペクタでもなく、ESLintの標準パーサーでもなく、eslint-babelにするってのがまたサイコー。
Reactコンポーネント名の規則
つまらないハマりがあったので。
const foo = React.createClass({
    render() {
        return <div>Foo</div>;
    }
});
console.log("JSX:" + ReactDOMServer.renderToStaticMarkup(<foo/>));
console.log("API:" + ReactDOMServer.renderToStaticMarkup(React.createElement(foo)));
上記のようなコードがあった時、出力は以下のようになりました。
JSX: <foo></foo>
API: <div>Foo</div>
JSXをBabelで変換していますが、こちらは「React.createElement("foo", null)」と変換してしまい、結果としてそのままマークアップに出てきちゃう。原因はJSXで先頭小文字の名前のコンポーネントをHTMLタグと認識してトランスパイルしちゃうから。回避方法はReactコンポーネントの命名規則として先頭大文字にするということです。
ReactのES6-classが所詮糖衣構文しかも甘くない
(承前:昨日の追記)
react-mixin(https://github.com/brigand/react-mixin)でES6のclass構文を試してみました。書いてから気がついたのは、短時間で試したぐらいの中ではちょっとコード書き直すだけでどんどん筋が悪い体裁になっていくので、時期尚早というか私にはまだ無理ゲー。もうチョイ調査が必要。
- propTypesの宣言がclassブロック外に記述
- getDefaultPropsの対応がclassブロック外に記述
- mixinの対応でreact-mixinを使ってみたけど。。。
- contextTypesの宣言はどうするのかわからず、contextがきっちり動く書き方が発見できなかった
無理にclass構文を使うのはやはりやめたほうが良いのだろうか。サンプルでよく見るようなシンプルなものだったら綺麗に書けるけど。。。どうせ今はbabelでトランスパイルするので所詮糖衣構文しかも甘くない!ってんで確信なければハマる必要がないかなあ。
一方で、mixinをラッパーコンポーネントのイディオムで書き直した方は筋が良いように思いました。今までのMixinの書き方から直して下記の感じかな。MixinをReactコンポーネントを返す関数にしてみました。クロージャーで引数コンポーネントを持ち回るのは、react-side-effectのソース見て学んだ。
function WrapByMixBar(WrappedComponent) {
    return React.createClass({
        displayName: "Bar$" + WrappedComponent.displayName, // Babelが自動で書き出さない
        getDefaultProps() {
            return {fromMixBar: "Bar"};
        },
        render() {
            return <WrappedComponent {...this.props}/>;
        }
    });
}
const Foo = WrapByMixBar(React.createClass({
    displayName: "Foo", // Babelが自動で書き出さない
    render() {
        return <div>Foo {this.props.fromMixBar}</div>;
    }
}));

console.log(ReactDOMServer.renderToStaticMarkup(<Foo/>));
より直感的?Mixinもちゃんとした(Duck-Typingではない)Reactコンポーネントになったので、クライアントサイドレンダリングだったらChromeデベロッパーツールのReactプラグインで中身見た時にきちんと層状に表示されます。コアとアスペクトが分離表示されてこちらが旧来より正しいように思う。その際にはBabelが対応しきれないdisplayNameを工夫しておくと吉。
追記
contextもなんか勘違いしていたみたいで、改めて書き下ろしてみたらES6-classでサクッと動いた!
class PutContext extends React.Component {
    getChildContext() {
        return {color: "#03a9f4"};
    }
    render() {
        return <div>{this.props.children}</div>;
    }
}
// propTypesと同じスタイルの設定
PutContext.childContextTypes = {color: React.PropTypes.string};

class GetContext extends React.Component {
    render() {
        const color = this.context.color;
        return <div style={{color: color}}>the context color is {color}.</div>;
    }
}
// propTypesと同じスタイルの設定
GetContext.contextTypes = {color: React.PropTypes.string}
Mixinも先のやり方で移行して、contextもOKとなると、記事タイトルから一転してES6-classで良くなったかも。